
Rapid technological advancements are providing a suite of new tools that can help advance ecological and biological studies of coral reefs. I’ve studied coral health and disease for the last several years. One large gap in our research approach is the ability to connect changes in coral health to large-scale ecological processes. I knew that when corals died from disease it would alter the fundamental habitat of the system, which in turn would impact associated reef organisms. What I didn’t know was how to effectively document and quantify these changes. Sometimes we just need to alter our perspective to find the answers we are looking for. I starting reviewing methods used by terrestrial researchers to measure landscape changes associated with landslides and erosion. In doing so I came across structure-from-motion (SfM) photogrammetry, and it was immediately clear that this technique could improve our understanding of coral reef ecosystems. I spent the next few years developing methods to use this approach underwater, and have since used SfM to detect changes in reef structure associated with disturbances as well as improve our understanding of coral diseases.
The first question I am usually asked is, “How easy is it to use this technique and what does it cost?” The best answer I can provide is the logistic constraints depend on your research question. If you are interested in accuracy and controlling the parameters of the 3D reconstruction process, then you should use proprietary software like Agisoft PhotoScan and Pix4D. These programs give you full control, yet require more understanding of photogrammetry and substantial computing power. Autodesk ReCap can process images remotely, which reduces the need for a powerful computer, but also reduces your control over the 3D reconstruction process. At the most simple level, you can download the Autodesk 123D catch app on your phone and create 3D reconstructions in minutes! There are also multiple open-source software options, but they tend to be less powerful and lack a graphical user interface. My advice is to start small. Get started with some simple and free open source tools such as Visual SfM or Bundler. Collect a few sets of images and get some experience with the processing steps to determine if the model outputs are applicable for your research approach.
The second question I receive is, “What is the best way to collect the images?” Unfortunately, the answer is not to use the ‘auto’ setting on your camera and just take a bunch of pictures. Image quality will directly affect the resolution of your model, and is also important for stitching and spatial accuracy. Spend time to understand the principles of underwater photography. A medium aperture (f-stop of 8 to 11) will let in enough light in ambient conditions while not causing blur and distortion associated with depth of field. Since images are taken while moving through a scene, a high enough shutter speed is required that will eliminate blur and dark images. Since conditions can be highly variable, one must adapt to changes in light and underwater visibility while in the field. Cameras with auto-ISO can be helpful for dealing with changing light conditions while surveying. I also recommend DSLR or mirrorless cameras with high-quality fixed lenses, as they will minimize distortion and optimize overall resolution and clarity. For large areas I won’t use strobes because I take images from large distances off the reef, and this will typically create shadows in the images. I take images of the reef from both planar and oblique angles to capture as much of the reef scene as possible in order to eliminate ‘black holes’ in the resulting model. There is no ‘perfect approach,’ but you will need 70-80% overlap for accurate reconstruction. I swim in circular or lawn-mower patterns depending on the scene, and swear by the mantra that more is better (you can always throw out images later if there is too much overlap). It is worth investing time in experimenting with methods to develop a technique that works best for your study are and experimental design. SfM is a very flexible and dynamic tool, so don’t be afraid to create your own methods.
The third question is then, “How do you ground-truth the model for spatial accuracy?” This is a critical step that often gets overlooked. In order to achieve mm-scale accuracy the software must be able to rectify the model to known x,y,z coordinates. I use mailbox reflectors connected by PVC pipe to create ground control points (GCPs) with known distances. The red color and white outline of the reflectors is easily distinguished and identified by the software and saves a lot of time for optimizing the coordinates of the model. Creating functional GCPs is exceptionally important is spatial accuracy is required for your work. I also use several scale bars throughout my reef plots to check accuracy and scaling. This step of the process is critical for accurately measuring 3D habitat characteristics.
Maybe I’ve taken you too far into technical details at this point, but hopefully this helps for anyone looking to venture into the world of SfM. There is no perfect approach, and we must be adaptable as software continues to improve and new tools are constantly being created. We also need to continue to develop new methods for quantifying structure from 3D models. I export my models into geospatial software to extract structural information, but this step of the process can be improved with methods capable of annotating the true 3D surface of the models. As new software becomes available for annotating 3D surfaces we are entering an exciting phase with endless possibilities for collating and visualizing multiple forms of data. Being open-minded and creative with these techniques may provide new insight into how these environments function, and how we can protect them in the face of global stressors.
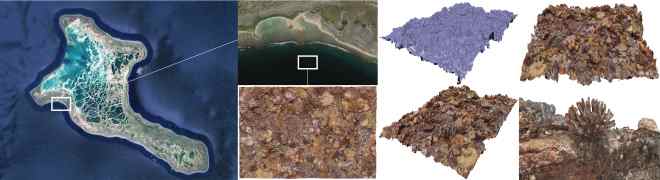
– Mahalo to John Burns for this in-depth guest posting. You can see more of his work, simultaneously beautiful and useful, at the Coral Health Atlas. Click on the image below for more of John’s remarkable 3D coral reef mapping work:


[…] of cyberinfrastructure need that eventually EarthCube architecture should be able to help stage. Look for a guest blog soon by John Burns to learn […]
LikeLike